


Showing posts with label Tutorial. Show all posts
Showing posts with label Tutorial. Show all posts
Tuesday, February 15, 2011


Thursday, November 25, 2010
Designer Challenge Thursday - 3D Tags
Hello folks, my name is Angela and it's blessing to do the Designer Thursday Challenge again this week. My challenge is for you to make a 3D gift tag (you can make more than 1 if you want to). My tag is hybrid - that means I'm using a digital scrapbooking kit, cropping it in my software and then printing it out to assemble. If you are new to hybrid or 3D paper crafting, I have a tutorial below for you. If you are going hybrid, please use at least 1 item from one of the current Designers at the Faith Sisters Store. Otherwise feel free to use your physical paper scraps etc to make your tag(s).
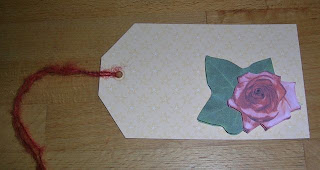


I made my tag using the Orange Spice kit by Toucan Scraps available in the Faith Sisters Store.
I'll have a special gift for people taking part in this challenge by the 1st Dec 2010. Please upload a photo of your tag(s) to the Toucan Scraps Challenges Gallery at Faith Sisters, and let me know that you have taken part either as a comment to this blog post, or in my Designer Challenge thread on the Faith Sisters Forum.
Tutorial
Set-up the page in your software to the size of card stock you are printing on. I've set mine to metric A5.
Most printers have a margin where it doesn't print anyth
ing. check your printer settings and place guidelines at the margin points (.6 cm for me).
If your software doesn't support guidelines then draw vertical and horizontal lines in the top layer.Choose your background paper (I'm using the stars background from the Orange Spice Kit by Toucan Scraps). Crop it to 3 x 5 inches.
Create an element cluster on the layer above it. (I'm using one of the Ivy Leaves and one of the Winter Roses from the Orange Spice Kit.)
Make a copy of the cluster and place it in the blank space on the page.
Make a copy of the top part of the cluster (the rose for mine) and place that on the blank space
Print onto sturdy white card-stock. (I don't know the imperial equivalent, but my preference is for 210 gsm.)
Cut out
At the opposite end to the image cluster, on the back, use a pencil to mark 3/4 inches from the corner on both long edges. And 1 inch from the corners along the short edge. Join the marks and cut along the lines to make the tag shape.
If you wish to write on the back of the tag, now is the best time to do so, as the 3D image will make it tricky.
Stick 3D foam pads on the back of the cut out images. (If you don't have any then cut small pieces of cardboard or foam and stick them with glue).
Stick the larger image directly on top of the image printed on the tag.
Stick the smaller image directly on top of the same image on the tag (for me the rose on top of the rose)
This layering technique is called 3D decoupage.
Punch a hole in the narrow end of the tag.
Optional - insert an eyelet into the hole.
Thread yarn/ribbon/string/twine through the hole.
Thursday, September 30, 2010
Designer Challenge Thursday - Make a Card
Hello folks, my name is Angela and I'm one of the new designers at Faith Sisters - Toucan Scraps. As well as scrapbooking I love to make cards and other projects. I often mix and match digital scrapbooking and paper crafting together, we call this hybrid crafting.
For my challenge this week I'd like to invite you to create a card. You could use your paper crafting stash and scraps, make one digitally or even go hybrid. Everyone taking part will get a little gift from me. Post your card to the FaithSisters Gallery and either let me know in the comments on this blog post or on the Designer challenge thread on FaithSisters Forum where to find your card. Challenge closing date for the participation gift is Wed 6th Oct.
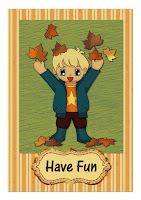
I have a little tutorial here for those of you new to the idea of making cards using digital scrapbooking. I used my new Kicking Leaves kit to make this card.
Tutorial
Set-up the page in your software to the size of card stock you are printing on. I've set mine to metric A5. Set the page to landscape.
Put a guideline along the vertical centre line - where the fold line will be. (If your software doesn't support guidelines then draw a vertical line in the top layer.)

Most printers have a margin where it doesn't print anything. check your printer settings and place guidelines at the margin points (.6 cm for me).

To keep the page balanced, place a margin line to the right of the centre line.

Choose your background paper. Place it on the page and crop to fit inside your guidelines.

Crop another piece of digi paper to a rectangle on the next layer. Add a small drop shadow.

Add an image or photo or elements cluster on the next layer. Add a small drop shadow.

Crop a piece of plain paper to a small rectangle/title block shape (or use a journaling tag/strip). Place it below the image and add a small drop shadow.
Add a greeting on top of the title block in a pretty font and/or alphas (I used One Stroke Script LET). I picked the colour from the boy's trousers and used that to colour my font.

Using the same font, but smaller, type your made by and credits details at the bottom of the left hand side of the page (this will be the back). I like to add a small image there too as a finishing touch.

Print
Score and fold along the centre fold line
For my challenge this week I'd like to invite you to create a card. You could use your paper crafting stash and scraps, make one digitally or even go hybrid. Everyone taking part will get a little gift from me. Post your card to the FaithSisters Gallery and either let me know in the comments on this blog post or on the Designer challenge thread on FaithSisters Forum where to find your card. Challenge closing date for the participation gift is Wed 6th Oct.
I have a little tutorial here for those of you new to the idea of making cards using digital scrapbooking. I used my new Kicking Leaves kit to make this card.

Tutorial
Set-up the page in your software to the size of card stock you are printing on. I've set mine to metric A5. Set the page to landscape.
Put a guideline along the vertical centre line - where the fold line will be. (If your software doesn't support guidelines then draw a vertical line in the top layer.)

Most printers have a margin where it doesn't print anything. check your printer settings and place guidelines at the margin points (.6 cm for me).

To keep the page balanced, place a margin line to the right of the centre line.
Choose your background paper. Place it on the page and crop to fit inside your guidelines.
Crop another piece of digi paper to a rectangle on the next layer. Add a small drop shadow.
Add an image or photo or elements cluster on the next layer. Add a small drop shadow.
Crop a piece of plain paper to a small rectangle/title block shape (or use a journaling tag/strip). Place it below the image and add a small drop shadow.
Add a greeting on top of the title block in a pretty font and/or alphas (I used One Stroke Script LET). I picked the colour from the boy's trousers and used that to colour my font.
Using the same font, but smaller, type your made by and credits details at the bottom of the left hand side of the page (this will be the back). I like to add a small image there too as a finishing touch.
Score and fold along the centre fold line
Have fun, can't wait to see your cards.
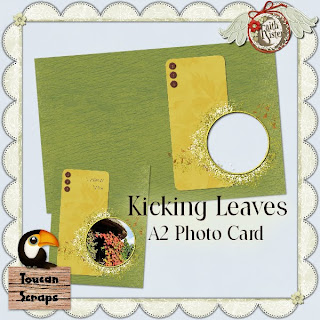
And I have this photo card quickpage as a participation gift. So lets see those cards.

Subscribe to:
Posts (Atom)
